Tuesday, December 22, 2015

Blue Egg Antique Shop - Interior and Sign Tutorial


It’s been a long time since I last blogged. I promised to show some more items from the interior of my antique shop (which I will, below) but first – I wanted to tell how I made my “Blue Egg Antique Shop” sign.

Shop Sign (mini) Tutorial:

The egg shape was cut out of foam core. I printed the words using Microsoft Word and WordArt (see file here):

Antique Shop Sign Word_Document

WordArt is a program embedded into Microsoft Word that allows you to change the angle, stretch, squeeze, etc.  If you have Word you can use the above file and just edit the letters, colors, font, etc.

I glued the lettering to the egg and added a few 'shadow' strokes in brown then painted a light blue (sort of dry brushed) around the outside of the egg leaving the inside white. To cover the foam core edge I glued on a flat gold braid.  I cut a small gold foil 'Dresden' decoration (see Ebay) in half and glued it to both ends of the egg.

The fancy rectangle frame is from metal miniatures (metalminis.com – see others described below). I usually wash, dry and spray all metal minis with a flat white spray paint before painting with acrylics. This frame was painted with gold acrylic (Decoart brand “Emperor’s Gold” Dazzling Metallics). After that dried I antiqued the frame with antiquing glaze (also acrylic – sold with the acrylic paints in craft stores). To use the antiquing glaze you paint over the entire frame then quickly wipe off with a paper towel. I have to admit the frame really looked like an antique gold frame when I was done. Be careful not to antique before the first coat of paint is very dry or it will just rub the first coat off.

I filled in the back of the rectangle with just cardboard painted blue then glued the egg right on front of the frame.

Now for some interior photos promised last JUNE! (sorry) 


On the left side of the shop is a desk and wrapping paper holder (to gift wrap all those purchases).  The desk was purchased but I think it was a laser kit. On the shelves:
Top shelf - several figures purchased on Ebay
Middle shelf - two bowls made from filigree findings painted shabby pink, lamps from ceramic beads, a tiny painted metal elephant (Metal minis #368 sm) and a purchased pitcher.
Bottom shelf - two painted shabby candlesticks (metal minis # 684) with added bobeches from jewelry findings, Elaine Cannon doll in dome (vintage).
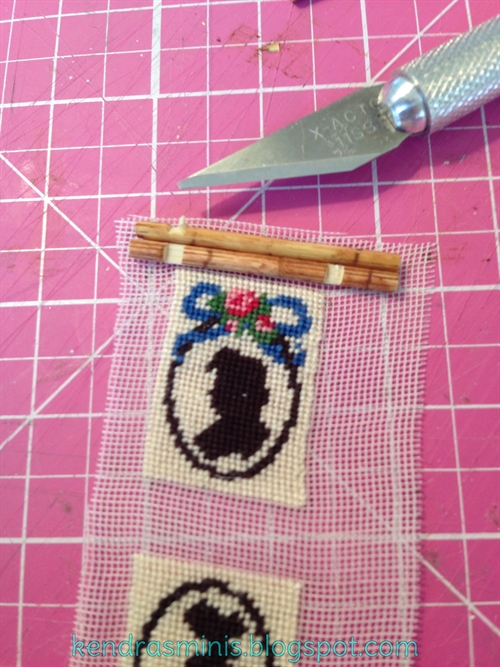
Center post - two petit point silhouettes (Ebay) framed with faux bamboo frames (see my earlier blogs).

In the CENTER section of the shelves:
Top Shelf  l to r- cruets made from glass beads (Spanish Miniatura magazine), painted platter (metal minis # 47), porcelain "Aladdin" teapot.
Middle Shelf - so many clocks, most are painted metal (see item numbers below).  Two smaller ones near front are made from findings. (Metal Minis clocks back row left: gold #934A, center gold #85, right beige/blue vase #100.  Front row left center small blue #934X, right gold alarm clock #426 lg, blue alarm clock #426 sm).
Bottom Shelf - gold leafed frame (metal minis # 463), lamp from bead, painting and Kummerows bird cage.
Center post (right) - framed signs, top one is metal minis # 806A, the other one I don't know where it was from.

Right side of shop, shelves:
Top Shelf: salt & pepper from beads (a tote bag item from this event), Staffordshire dogs - painted metal minis #725.
Middle shelf: Chrysnbon decanter set and bowl of flowers
Bottom shelf: elephant figures (Ebay), finch egg with glass elephant (made by me years ago).


On and around the chair:
The petit point rug was an estate find.  It was unfinished so I rolled it up and put a price tag on it.  The petit point picture on the wall was by Ligia Durstenfeld (60 count) framed in faux bamboo.  The chair was also an estate purchase - I added the skirt and padded seat.  The box I made using Microsoft Word and printed on heavy paper. I also wrapped the packages.


Front Window Display:
Tatted doilies were made by my friend, Karen Haggard.  Another pair of Staffordshire dogs - painted metal minis.  The swan planter is also a metal mini.  Other items were show purchases or Ebay.  The house under the dome is by Sylvia Mobley on a pedestal by  Eurosia.  The glass bird dome and blown glass goose were Ebay purchases.  Brass bird cage is a vintage Kummerows piece.  Plate was purchased on Etsy from A Lavender Dilly.  The canister with bird nest inside was made from plastic tubing and a button top.


Last photo - the door and one more metal miniature: frame #767 (Open sign).  The shop hours sign was a tote bag item.

Better late than never (getting back to my blogging).  I'll have one more mini tutorial from this project on how to make the tiny price tags and a plate stand hint.  Thanks to all those of you who follow my blog and for your nice comments, too.

Merry Christmas!

Kendra


Thursday, June 18, 2015

Blue Egg Antique Shop...and a couple of Tutorials


Before I get into the tutorials I have to put in a plug for Society of American Miniaturists (S.A.M.).  SAM is the non-profit organization I belong to that held the event where we made the Antique Shop.  S.A.M. is dedicated to furthering the miniature dollhouse hobby.  For a very small yearly fee ($15) a member may attend a FREE full day workshop which includes:
  • the project structure
  • a few smaller kits which we assemble during the day AND
  • a bag of Tote Bag favors to go along with the theme
  • Oh, yeah! And lunch (and birthday cake)!

The tote bag favors are donated and made by some of the approx. 150 members of the organization who each make 100 of the same item to go into the tote bags.  This event funded by yearly dues and the generosity of the members who want to bring more people into the hobby by offering a fun, free event to all members. (P.S. Membership is OPEN! - see the website, www.minisam.org)  If you want to see some of the lovely Antique Shops made by the event committee click here.

Back to the tutorials!

These are not in-depth tutorials - just description of how I modified a bookcase that was part of the S.A.M. Antique Shop project and how I made a skirted table to sit in front of the display window.

Bookcase
The bookcase was designed and cut out by the talented ladies of the Houston and surrounding area clubs who hosted the event.  It must have been difficult to cut out 100 of these because each arch was a triple arch and the wood was kind of thick.  Here is what it looked like before I embellished it:

I added the vertical trim strips - just some kind of door or window frame molding (commercial).  To make the upper arches look somewhat carved or appliqued I glued on pieces cut from a cheap paper doily:


After painting and glazing with diluted Burnt Umber acrylic it looked like this:


Skirted Table:
I needed something to sit against the display window and hold some items while not taking up too much room inside the box.  My solution was to make a semi-circular (sort of) shaped table from stacked pieces of ceiling tile.  Many years ago I took a workshop from Judee Williamson and Nicole Walton-Marble and they used ceiling tile to make chair forms.  The ceiling tile is about 3/4 of an inch thick (?) from Home Depot or similar stores.  I cut them out on the scroll saw then glued them together and sanded them.  I needed a little extra height so I topped it off with a piece of foam core.


In the foreground are two table tops I cut with the scroll saw then routed an edge using a pin router made from a dremel tool.  I learned this from a class taught by Tom Walden (awesome class if you ever get a chance to take from him!).  I made two because I was unsure of my ability having only done this in his class prior to this project.

The table form was painted with Gesso and small beads added for feet.  Feet are needed so that if the skirt is uneven (which it will be) the white ceiling tile won't be visible at the bottom.

I pleated my skirt on the Pretty Pleater, skipping over two rubber ridges then over one, etc. Makes for a more natural looking (less perfect) skirt.  I ironed a strip of fusible interfacing across the top to keep the pleats (will be cut off later).

Gluing on the pleated skirt - (tons of glue spread all over the table sides).  I didn't take a photo of how I kept it against the table but I wrapped rubber bands around it near the top and let it dry.

After sides were dry I folded it over the top and clipped and removed a lot of bulky gathers before gluing:

Here is how it looked after gluing on the table top (with some lovely items made for me by my friend Karen Haggard).


Here is the table viewed from outside the window.  You can't really see the table from the outside.  It is just the right height and just as wide as the window so that lots of little things can be displayed up close to the window.  The first two photos below were my trial and error of deciding what should go in the window.  The last photo is the arrangement of accessories that I finally decided on.

Kind of an Easter-ish theme with blue eggs (as in the store sign):

Final arrangement - more blue items were chosen to go along with the "Blue Egg" theme and colors of items inside the shop.

Hope to show some more Antique Shop photos - interior shots in my next blog.

Wednesday, June 17, 2015

Some Christmas Pretties

I am about to update the photos at the side of my blog since the Christmas theme items have been there for a while.  But if I remove them I realized they can't be seen again unless I put them in a blog post.  So I decided to create this blog post for future retrieval.   These are all 1:12 scale.  Enjoy!


 (above) A collection of Christmas trees, wreaths and jars of ornaments I made back in 2012.  Some were sold on Ebay (I don't sell very often - just when I need to fund a trip or event).  The ornaments are ones described in an earlier blog here.


(above) A Christmas skirted table in silver, red and white theme made back in 2012 and sold on Ebay.

Another tree, wreath with "Mackenzie-Childs" theme.  The nutcracker is a painted metal miniature.  See the tree top ornament - it is made to look like the Mackenzie-Childs double gourd style tree topper and is made from a plastic bead (with painted checkers), a T-pin for the point and another gold tube bead.  I make the bows using a small block of wood with two nails as a bowmaker. Here is a close up:


Since this is June, I guess my blog readers are getting a little Christmas in June.

Tutorial - Faux Bamboo Frame


This is a fairly easy  method of making a antique looking frame appropriate for even your nice petit-point picture or sampler.  It is unique, not manufactured looking.  You will need to be able to paint thin lines but the method eliminates the need to have a steady hand and it doesn’t have to be straight!  There are two methods – notched corners and butt joint (easier).  Both result in a nice hand made antique (sort of Tramp Art) look.

Materials:
Small dowels, toothpicks or skewers (extra long toothpicks - grocery store)
Acrylic paint, Burnt Umber or very dark brown
Folk Art (brand) Antiquing Medium (Hobby Lobby or craft stores)
X-acto knife with new blade
Artwork to frame
Small scrap of matboard (from an old frame)
Very tiny paintbrush (10/0 or similar)
Larger round paintbrush (5 or 6 round or similar)
tacky glue


Faux Bamboo Paint Technique:
For this project you want very tiny rings but you want them dark.  Squirt a little Burnt Umber paint on a plastic yogurt lid (or other palette) and put a tiny drop of water beside it DON’T MIX THEM YET!


Paint the Rings: Practice on one toothpick: Get your tiny brush (10/0 or so) wet with paint.  Hold the toothpick with one end touching your work table and the other end with your thumb and index finger so you can gently roll the toothpick in place while painting the rings.  Try first with paint directly from the bottle for your first ring around the toothpick.  If it skips or seems too dry, mix in a little water – with trial and error you will find the best mix that flows smoothly while making the thinnest dark line.  (It must be dark so it will show through the ‘antiquing’ step).

Continue making rings all along the toothpick about 3/8 or ½ inch apart.  Do all your toothpicks (enough for all you want to frame). 

Comparison of steps - rings, speckles, antiqued (top to bottom)


Paint the Speckles: After the rings are done, paint tiny speckles between the rings – using 2 or 3 tiny dots (tiny as possible but dark enough to show up when antiqued).  Twist your toothpick and make sure you speckle all sides so no matter which side is up you can see rings and speckles.

Let dry thoroughly (15 min or so).

Close up of speckles and antiqued skewers


Antiquing: With your larger brush, cover the toothpick with a sort of thick coat of antiquing medium.  Because these skewers/toothpicks don’t absorb very well, I let it sit 30 seconds or so.  Then wipe off gently with a dry paper towel (not wet – it will take off too much).  Again, use trial and error to determine the time needed for the look you want.  Let dry thoroughly (the antiquing medium takes a while to dry – 30 min?).  If you decide you want it darker, wait until it is thoroughly dry before you re-coat or you will just take more of the glaze off.

Antiquing

Framing:
Mount your art:–  For mounting petit point or needlework, I used mat board scraps which I made thinner by splitting and peeling a few layers off the back.  Then I wrapped the excess silk gauze around to the back and glued it.  If you don’t want to put any glue on the actual needlework, glue the back of the mat board to a slightly larger (by the width of a toothpick) piece of index card or fabric.  Then (later) you can glue your frame to that and no glue has to touch the stitches.

If you are framing  a paper picture, consider if the mat board is thin enough by laying the mat board next to a skewer.  The skewer should be slightly thicker.  If necessary, peel some layers off the back of the mat board.

Notched look – first cut the lengths:  For a notched frame (criss-cross at each corner), cut the four pieces of painted faux bamboo so they extend ¼ inch on each side of the art (total of ½ inch longer than the side of the art).  To cut the sides to length, use your X-acto knife with a new blade (these skewers are very hard).  On your cutting surface, gently roll the toothpick while cutting.


Make the Notches:
 (Note that when making the notches, the cuts should be deep enough to feel them (when you slide your knife across the bamboo) but NOT go all the way through.  The goal is to remove a small notch of wood halfway through the thickness of the toothpick.  You will be making two notches on each side of the frame.  Both notches on each piece of wood will face the same way. 

Lay one cut bamboo piece against the art, centered along the side you are framing, and mark with the X-acto where the first notch should start (right up next to the art).  This mark should be kind of deep, so you can feel it and find it again.  Then, about 1/16 inch away from that, toward the end of the bamboo make another cut, deep enough to feel it.  Pull the skewer away from the art and deepen each cut a little (CAREFUL!  DON’T CUT THROUGH!!).  Remove the notch between the cuts by slowly and gently twisting the knife TOWARD THE CENTER OF THE SKEWER.   Keep cutting and removing until you think you have a notch about half way through.  Repeat for the other notch and for the other 3 sides of the frame.  When you have all 4 sides each with 2 notches, dry fit the notches together so they overlap and see if you need to enlarge or clean them up a little.  (mine were not exactly half way through so  two sides were a little higher than the other two after the frames were done – I was afraid to notch them too much and risk cutting through).
Positioning of notches

Match notches on opposite side pieces


Now is the time to trim the ends if they are not even or if you just want the overlap to be smaller.  Also you can touch up the ends of the bamboo with a little antiquing medium.

Glue frame pieces to the art (or to the backing piece) weight down and let dry.

Un-notched or Butt Joint method:  (see photo at beginning of blog)  Cut the shorter sides first.  Glue the shorter sides to the art, right against the edge of the mat board (its thickness is enough to hold the bamboo frame).  Clamp these if you want.

When dry, cut the longer pieces so they extend beyond the first pieces as much as you like.  Glue the last two frame pieces up against the mat board and the other bamboo pieces.  Again, clamp if desired.  When dry touch up the ends of the cut bamboo with antiquing medium.

Frames hung in my Antique Shop


Tuesday, February 17, 2015

Tutorial - Antique Shop Awning


The Society of American Miniaturists (S.A.M.) held a workshop in February 2013 to make a "Treasured Collectables" shop or Antique Shop.  It came with a nice awning but I wanted to modify it slightly.  Included below is a brief tutorial on how to make the awning.  I was inspired by photos I found on the internet of a Laduree confectioners shop in France.


Photo 1
Frame is made from pieces of mat board cut to sizes in photos above.  The three pieces at the top should be glued together  in a "U" shape as shown.  They form the back brace (will be glued to the building and to the fabric of the awning). 

The lower frame (rectangle shaped) has 2 long and 2 short pieces.  The shorter frame piece measurements are hard to see in the photo but they are 1" long by 3/8" high.  Glue two longer pieces to the inside of the shorter pieces.  The final depth of the finished frame is 1 inch (the width of the short piece). The two pieces in the lower left of Photo 1 (marked 7/8 x 3/8) are braces for inside the rectangle to keep it's shape (see photo 2 background).  Glue those in. Cut the 3 skinny strips - they will be used later.

Photo 2
I rounded the top edges of the back brace slightly using a sanding stick so it would be a gradual slope when fabric is glued around it.

Photo 3
Back brace after sanding (above).  Glue this to the center back of the rectangle as shown in Photo 1.


Photo 4
Pattern for fabric.  I used edging scissors to make the scalloped edge.  BEFORE CUTTING THE FABRIC, first cut the scalloped border on the lower edge of the fabric.


Photo 5
Next seal the scalloped edge with glue to keep it from fraying.
 
Photo 6

Then  trace the pattern on the fabric with pencil then go over it with a thin glue line - again to prevent fraying.  After it's dry you can cut on the pencil line.


Photo 7
Photo 7 above shows placement of the frame on the fabric.  The two flaps on the outer sides will fold in and become the sides of the awning.  DON'T GLUE YET.


Photo 8
Angle the very ends of the skinny strips as shown above.  These support the curved front of the awning.

Photo 9
Glue the skinny strips as shown in photos 9 & 10.

Photo 10
You can see how the strips are mitered making a smooth transition from the square (rounded with sanding stick) frame.  Don't worry about the wrinkles in the strips.  Sort of adds to the character.  After the strips are glued you can glue the fabric to the front edge of the rectangle frame (it is glued in Photo 10).


Photo 11
Now this is a bit tricky.  You will fold in one of the flaps and glue it to the short edge of the rectangle frame (the 1 inch long side).  Then you will match up the side and front curves to each other and kind of pinch them to make a seam.  I like to use Crafter's Pick Ultimate glue because it seems to hold very well on fabric.  I wasn't worried about it soaking through since I intended to paint the entire thing black.

Photo 12
Better veiw of the seam.  Just a little warning - my two sides looked different from each other.  Takes some trimming and pinching, trial and error to get it to look right.  Use enough glue so you can trim the seam down almost to the gap.  Let dry thoroughly before doing any trimming of the seam.

Photo 13
With both my curved seams done I glued the fabric to the skinny strips.  Note that your side piece (fabric) should be a triangle that fills in the space between the awning and the wall so there shouldn't be huge gaps between the fabric and wall it will be glued to (you won't really be gluing the fabric to the wall - just the frame.).

Photo 14
Seam looks ugly but it will be painted and trimmed a little more.

Photo 15
You can see in the photo above I should have ironed my fabric before I started.  Thought painting it would take the creases out (wrong!).

Glue the top flap over the U shaped brace.

I painted the entire thing several coats of acrylic black paint.  It soaked in and looked kind of ugly for a while but after it was all done it looked very convincing - like an outdoor canvas.  I also painted all the pieces of mat board framing in case they ever would be visible from someone looking into the window.

Here is the finished awning.  You can see the skinny strips through the fabric - just like a real awning.  I edged the scallops in white paint like some of the photos I saw of real ones.  Hope you find a use for one of these on your mini shop or store front!  I hope to add some tutorials on how I finished some other items in this project later.